

How To Blur Someone Out Of A Picture In Photoshop
At that place are many means to blur or pixelate a confront in Photoshop. In this tutorial, you're going to learn one of the easiest and most beginner-friendly ways to practice so. The process is unproblematic, and information technology is easily replicable for other parts of an image, not merely a face. Here are the basics of how information technology's done.
To blur a confront in Photoshop, first convert to prototype layer into a smart object. Next, go to Filter > Blur > Gaussian Blur to apply a general mistiness as a smart filter. Clicking on the smart filter layer mask, invert it, and so select the Brush Tool and paint white over the faces you wish to blur.
At present, these steps might sound a piffling complex, just I promise it's super easy! Throughout this tutorial, you'll learn how to mistiness faces in a non-destructive way making information technology like shooting fish in a barrel to become back and edit afterwards on. Once you lot accept blurring faces nailed down, we'll motion on to the next type of face up-concealing, pixelation!
Without any further delay, let's get started.
How To Blur A Face up In Photoshop
In Photoshop, you can edit images in a subversive way and a non-destructive way. Subversive editing is when you make changes to a file directly. This overwrites the original data, and you cannot get back the original file.
Non-destructive editing, on the other hand, allows you to make changes to a file without overwriting the original. Therefore, if you want to go dorsum to the original file, yous can hands.
During this tutorial, only non-destructive editing will be done. So, if you make a mistake, don't worry, you can always go back.
To go started, open your image in Photoshop, then get to the Layers panel. At present right-click on your layer and click Convert to Smart Object to turn the layer into a Smart Object.
Now that you've converted your layer to a Smart Object, it'south time to mistiness it. Go to the Menu Bar at the peak of the window and click Filter > Blur > Gaussian Mistiness.
Next, a popular-upward window will announced, which will allow you to determine the level of mistiness applied to your image. You'll also meet a preview of your image to view how the blur volition await. The preview will be at 100% zoom by default. All the same, you can zoom out to meet your photo in full to see how the blur will affect your unabridged paradigm.
At present that you can run into the epitome fully, adjust the slider to see the level of mistiness yous want to apply. One time yous've found a level yous like, click OK to use the Gaussian Mistiness effect to your image.
I chose a radius of 25 pixels to blur my prototype. Here's how it looks:
Now that the mistiness effect has been applied, it's fourth dimension to remove it from everywhere just the face. Go to the Layers panel and click the Smart Filter layer mask thumbnail.
Afterward, select the Castor tool (B) from the toolbar. Then open the castor settings, and reduce the hardness to 0%. This will give you a soft brush effect, which will make the blur blend in better with the residuum of the image.
Since the Smart Filter is selected, y'all'll discover that your foreground and background colors are black and white. The Smart Filter mask works exactly like a regular layer mask. Painting blackness allows you to hide parts of the paradigm, while white allows you to reveal them. Ready your foreground color to black, then brainstorm painting everywhere on the picture except the face.
When you're finished, you'll find that the Smart Filter layer mask is blackness everywhere except where the face up is. The remaining white areas point that the mistiness is yet visible in that one area.
Everywhere on your image should exist clear, except the face, which should remain blurred. Then it'll look like this:
How To Blur Multiple Faces In Photoshop
Now that you know how to blur a face in Photoshop, you might exist wondering what about blurring multiple faces. The procedure is similar and only as easy. Once more, outset past opening your image in Photoshop.
Side by side, go to the Layers panel, right-click on the layer and click Convert to Smart Object.
Afterward, become to the Card bar, click Filter > Blur > Gaussian Blur.
Next, you lot'll see the Gaussian Blur popular-up window, where you lot'll be able to adjust the corporeality of mistiness you want to utilize to your image. Once you've done this, click OK to utilize the Gaussian Blur effect.
Now you'll see your prototype has been blurred, and a Smart Filter has been applied to information technology.
Now that your image is blurred, you need to remove the blur from everywhere except the faces. First by clicking on the Smart Filter thumbnail, selecting the brush tool (B) from the toolbar, and choosing a soft brush.
With black as your foreground color, brainstorm painting over the image to hide the blur effect everywhere except the faces.
You'll see that the Smart Filter thumbnail has everywhere painted blackness except for the faces. And on your prototype, you'll meet that simply the faces are blurred.
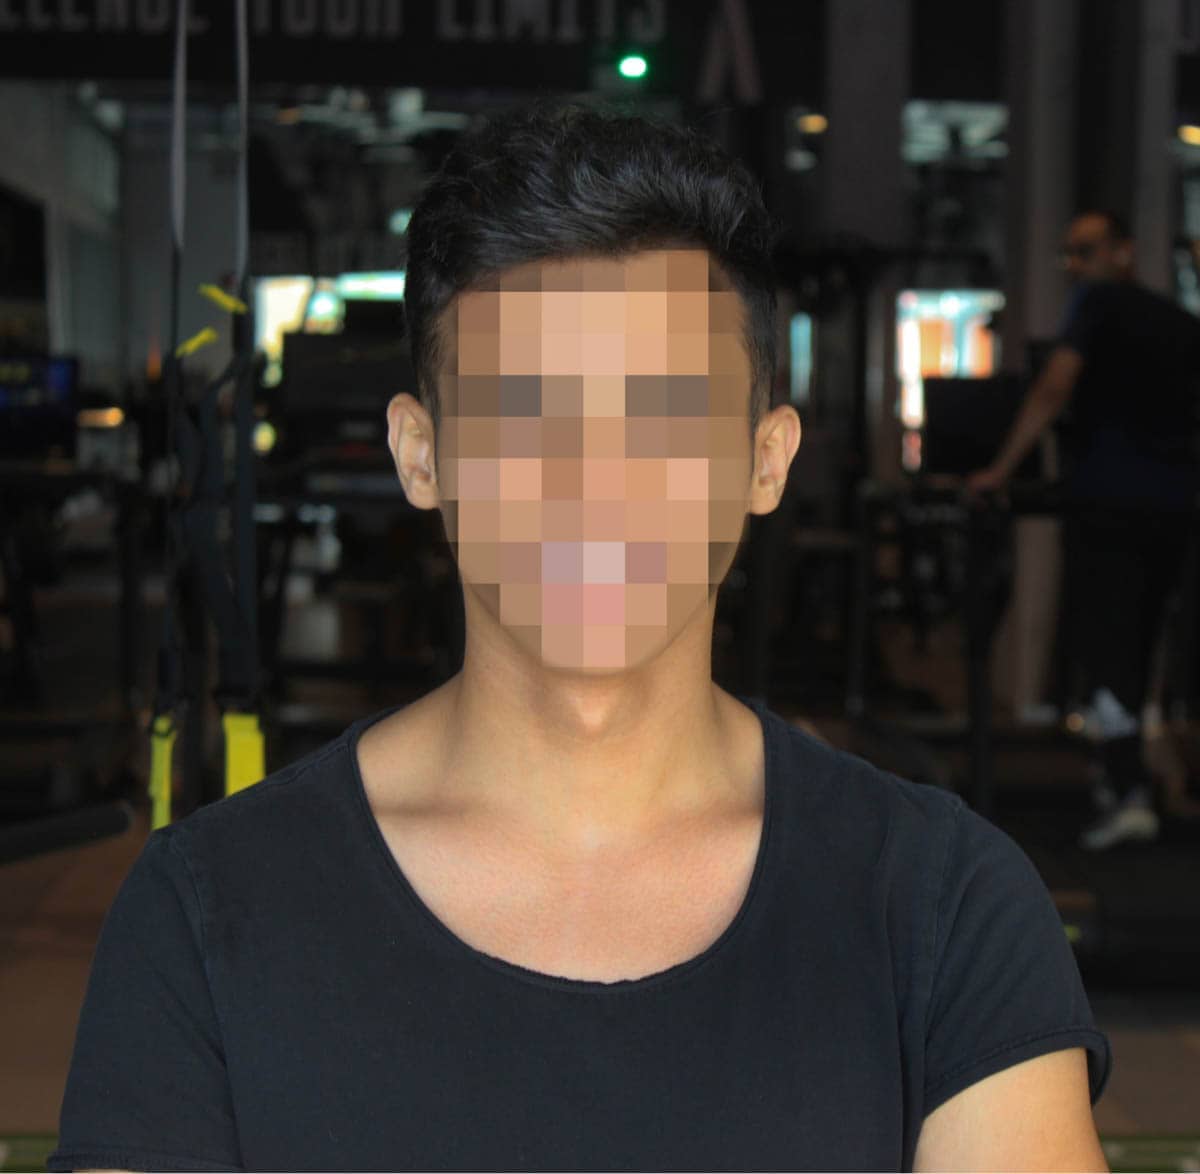
How To Pixelate A Face In Photoshop
To pixelate a confront in Photoshop, select your image layer, select the Lasso Tool, and set the Lasso Choice Feather to 20PX. Then create a Lasso Option around the facial features of your field of study. Now go to Filter > Pixelate > Mosaic to apply a pixelation upshot to the model's face.
First past opening your image in Photoshop. Then become to the Layers panel, right-click on the layer and select Convert to Smart Object to convert the layer to a Smart Object.
Once the layer has been converted to a Smart Object, select the Lasso Tool (L) from the toolbar. Y'all're going to use it to create a selection around the confront of your subject. However, before y'all practise that, y'all need to ready the Lasso Tool's feather to 20 px.
This will make the edges of the pixelated face softer and blend in better with the residue of the epitome. Once the plume has been adjusted, create a selection around your subject's face. You can exercise this past clicking and dragging your cursor. The Lasso Tool will trace the movements of your cursor and turn it into an active selection.
Next, go to the Carte bar and click Filter. From the dropdown menu, select Pixelate > Mosaic.
A pop window will announced with the Mosaic options and a preview of how the effect volition wait. The preview is 100% on default; still, that doesn't allow you lot to run across the image in its entirety. Zoom out until yous can see the full image.
After yous've zoomed out, arrange the Cell Size. This will determine how pixelated your image volition be. As you can meet from the preview shown, I used a jail cell size of 120. Nonetheless, yous can play around with the slider until you find a jail cell size that works for you. Once complete, click OK to use the issue.
Looking at the Layers console, you lot tin can see that a Smart filter was practical since you converted your layer to a Smart Object.
Here'southward the before and after:
-

Before -
After
At that place you have information technology. You've learned how to mistiness a face up, blur multiple faces and pixelate a face in Photoshop!
Happy Editing!
Source: https://www.bwillcreative.com/how-to-blur-and-pixelate-faces-in-photoshop/
Posted by: gaddytheyed.blogspot.com
0 Response to "How To Blur Someone Out Of A Picture In Photoshop"
Post a Comment